In this article, we will explore the process of permanently and completely deleting a WordPress site. While it may not be overly complicated and can be done in approximately 30 minutes, it is important to note that this process differs from simply abandoning your site. Even if you have ceased running your site, there is still a risk of hackers gaining access to it. Preventing hackers from taking control of your abandoned site is crucial.
Apart from security concerns, there are other valid reasons to consider permanently wiping your WordPress site. You might wish to disassociate yourself from the content you have published, or perhaps your business reputation did not meet your expectations, leading you to want to erase everything permanently. Another reason could be the desire to merge your blog with another platform, prompting the need to learn how to delete a WordPress site permanently.
WordPress.com vs. WordPress.org
Although WordPress.com and WordPress.org may have similar URLs, they differ significantly in their offerings. WordPress.com serves as a platform designed for launching and managing websites, with a team of experts handling hosting, maintenance, and security aspects. On the other hand, WordPress.org provides open-source software that enables website operation. With WordPress.org, the webmaster assumes responsibility for managing themes, plugins, updates, hosting, and security.
Regardless of whether you utilize WordPress.com or WordPress.org, we will guide you through the process of permanently deleting your WordPress website.
How to Delete a WordPress.com Website
To ensure the complete and permanent deletion of your WordPress.com website, please follow the steps outlined below.
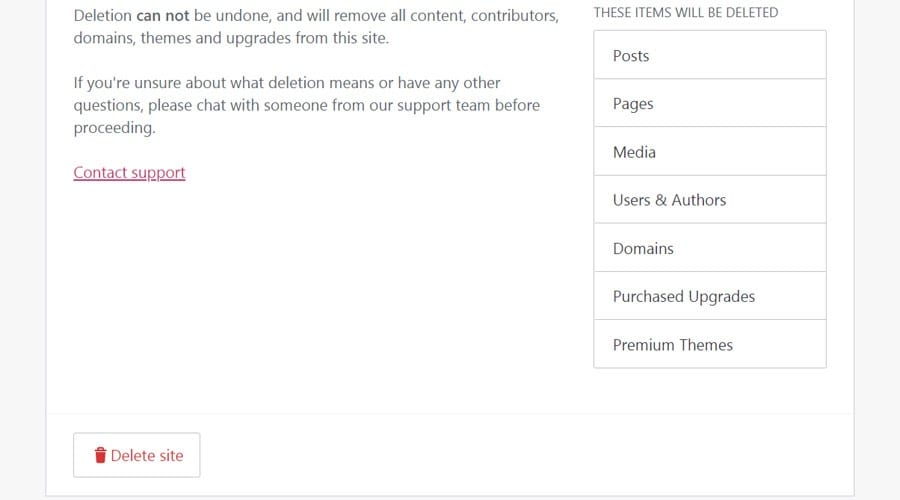
Fortunately, WordPress.com provides support in case you accidentally delete your site or have a change of heart. However, it’s crucial to note that this option is only available for a limited time of 30 days after the site deletion. After this period, your site will be irretrievably removed.
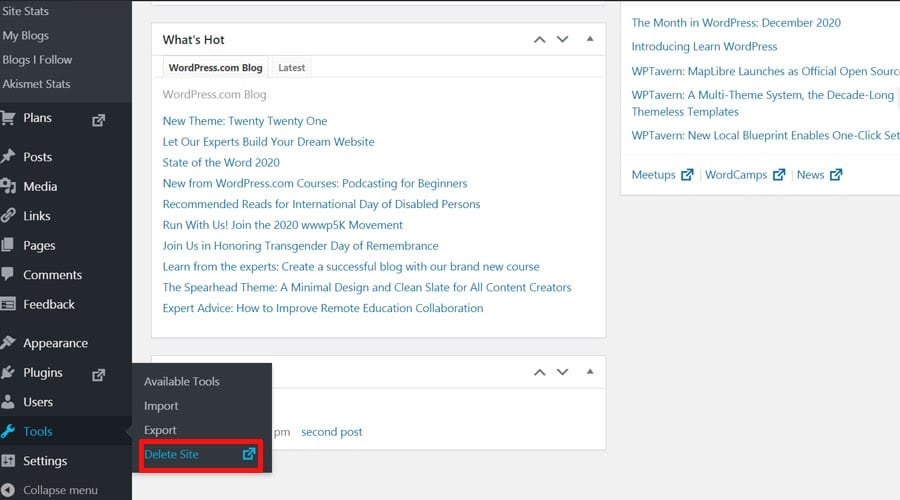
- Go to your WordPress.com site’s dashboard and click Tools.
- Choose Delete a Site (the last item from the drop-down menu).
Before taking any action, export your content. It takes the shape of a zip file.
Scroll to the bottom of the page, read the explanations, and click Delete Site.
- Type in the name of the WordPress site you want to delete.
- Click Delete this Site. If you typed in the correct name, the site will be deleted.
- Login to your WordPres.com dashboard.
- Click My Sites > Settings.
- Scroll to the bottom and click Delete your site permanently.
- Export your content.
- The rest of the steps are similar to the above method
How to Delete a WordPress.com Site with Upgrade
The method above works perfectly if you haven’t upgraded your website. For instance, you may have purchased additional storage or a domain name or used a premium theme. If you have done any of these things, you will get a message asking you to cancel the paid upgrades before deleting your site. That’s not a problem at all. Just do the following:
- Click Manage Purchases in the window informing you to cancel your premium upgrades.
- After being redirected to the Purchases section, cancel or transfer all your paid upgrades.
- Start the process described above again. It should work smoothly this time.
Deleting a Self-Hosted WordPress Website
Although the process of permanently deleting a website is generally straightforward, it’s important to note that there may be slight variations in the steps due to different host interfaces and tools. So, if the screenshots in this guide differ slightly from what you see on your hosting platform, there’s no need to worry. The key is to follow the steps outlined below:
- Create a backup copy of your website.
- Delete the site files from your hosting account.
- Delete the site database associated with your website.
- Block search engine spiders from crawling your site.
- Remove the content of your website from search engine indexes, such as Google and Bing.
- Notify the Wayback Machine to exclude your site from its archives.
Create a backup copy of your website.
Creating a backup copy of your website before permanently deleting it may not be mandatory, but it is a wise precautionary step. There are several reasons why having a backup can be valuable. You might require certain site assets in the future, or you may want to refer back to specific content or data. Taking just ten minutes to create a backup and save it on your computer’s hard drive can provide peace of mind. Fortunately, there are numerous free backup plugins available, making it easy and accessible to perform this essential task.
Delete the site files from your hosting account.
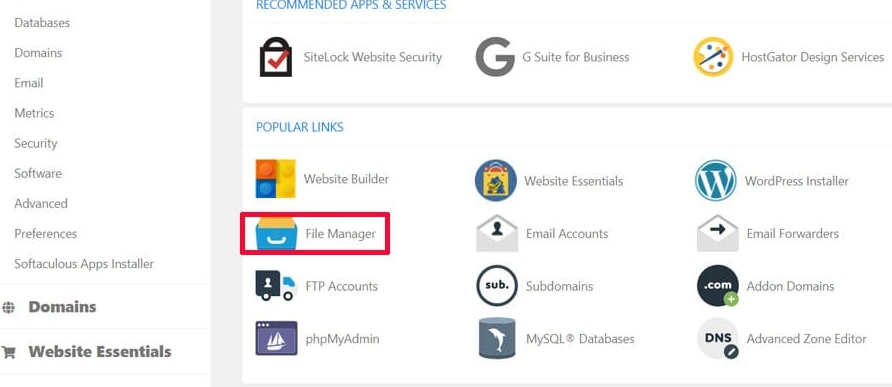
Most web hosting providers offer users the ability to edit and manage their site files. One common tool for this purpose is the File Manager, a web-based application accessible through the hosting provider’s dashboard. To access it, locate the File Manager icon and enter the required credentials. Once inside, you can select all the files (Ctrl+A) and delete them.
Alternatively, you can use a file transfer protocol (FTP) or secure file transfer protocol (SFTP) client. Although these tools may seem daunting to less-experienced users, they are straightforward once you have the necessary credentials. Typically, the initial emails from your web host will include the hostname, FTP username, and FTP password. If you can’t find this information, don’t hesitate to contact the web host’s support team for assistance.
Filezilla is a widely recognized and reliable FTP and SFTP client that is free to use. Connect Filezilla to your website host, navigate to the appropriate folder (usually public_html), and delete your site files.
Another approach is to use Softaculous, a powerful auto-installer available with many hosting providers. Softaculous simplifies the installation process for various software, including WordPress. To delete your WordPress website using Softaculous, follow these steps:
- Access the hosting provider’s dashboard and locate the Softaculous icon.
- Click on the icon and select WordPress.
- In the “Current installations” section, choose the WordPress website you want to delete.
- Click on “Remove” in the “Options” area, ensuring you select “Remove Completely” from the drop-down menu.
Delete the site database associated with your website.
Having learned how to delete the files of a WordPress site, the next step is to delete its MySQL database. Follow these steps to remove the WordPress database associated with your site:
- Access your hosting provider’s dashboard and navigate to the cPanel or control panel.
- Locate and click on “MySQL Databases.” This will bring up a list of databases.
- Select the database corresponding to the site from which you have already deleted the files.
- Delete the database by following the provided options or prompts.
By completing these steps, you will successfully delete the MySQL database associated with your WordPress site.
Block search engine spiders from crawling your site.
Search engines, such as Google, utilize complex algorithms to determine the ranking of websites. While search spiders will eventually stop attempting to crawl a deleted WordPress site, it is still advisable to block them from accessing it. To do this, you can create a robots.txt file and place it in the root folder of the removed WordPress site. Within the robots.txt file, add the following two lines of code:
User-agent: *
Disallow: /
By implementing these lines of code, you instruct search engine spiders to refrain from accessing any content on the deleted WordPress site. This helps ensure that the site remains inaccessible and unindexed by search engines.
Remove the content of your website from search engine indexes, such as Google and Bing.
Despite deleting the files and database of your website, it is possible for search engines to continue listing your site in search results. This is because search engines intentionally keep displaying sites even after they have been removed. While this may not be helpful in our current situation, it serves as a valuable feature overall. Imagine if search engines immediately removed crashed sites from their results every time. To prevent your deleted site from being accessible to users through search engines, it is necessary to request that search engines cease displaying its content.
Remove Content from Google
For a more comprehensive understanding of how Google handles this matter, I recommend referring to the Google Search Central documentation. This resource provides valuable insights on removing content from Google search results, including sources that you do not control. However, removing your website’s content is relatively straightforward since you have full control over it.
To initiate the removal process, you need to confirm your ownership of the website in Google Search Console. Once verified, you can proceed to submit a removal request by entering the URL of the site that you have already deleted. Following these steps will help ensure that the content of your deleted site is removed from Google’s search results.
Remove Content from Bing
While Google dominates the search engine market, it’s important not to overlook Bing. If you want to ensure your deleted website is removed from Bing’s search results, follow these steps:
- Visit the Microsoft Bing website and navigate to the Webmasters Tools and Features section.
- Look for the option to “Remove Broken Links and Outdated Cache Pages.” Here, you will find comprehensive information on removing your content from Bing.
- If you’re short on time or prefer a direct approach, you can go directly to Bing’s content removal tool. This tool allows you to quickly request the removal of specific URLs from Bing’s search results, ensuring your deleted website is no longer displayed.
By utilizing Bing’s content removal tools, you can effectively remove your website’s content from Bing’s search results, regardless of its market share compared to Google.
Notify the Wayback Machine to exclude your site from its archives.
The Wayback Machine is a powerful tool that captures snapshots of websites over time. With a collection of over 514 billion web pages and counting, it provides a valuable resource for exploring past versions of websites. By simply entering the name of your site in the search form, you can access snapshots of your website.
However, if you prefer not to have your site’s snapshots stored in the Wayback Machine’s extensive database, you can contact them via email and request the removal of your site.
It’s important to note that while you can take steps to minimize your site’s visibility, there is no foolproof method to ensure complete removal of all traces. Aggregator sites may still link to your posts, and screenshots of your site may exist elsewhere. Nevertheless, by following the suggestions provided above, you can significantly reduce the footprint of your site in most cases.